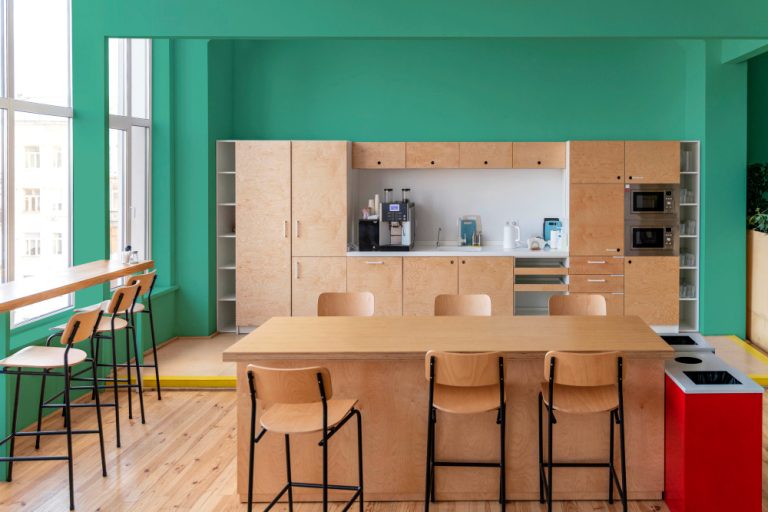
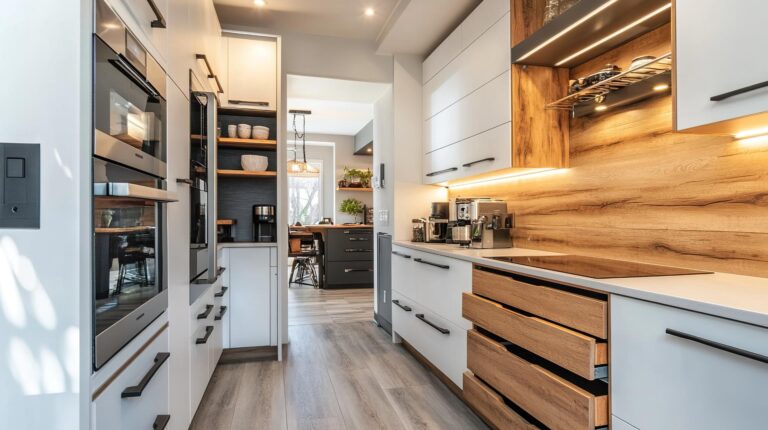
7 Walk-In Closet Ideas to Maximize Your Space

Step into your closet and picture a world where calm and order greet you. Envision a spot where each shoe has its home, and your outfits hang ready for the day ahead. A dash of creativity and a few clever closet design tricks can turn even the tightest walk-in into a roomy retreat of style and practicality. No matter if your space is snug or sprawling, let’s dive into ways to maximize every bit of it.

Walk-In Closet Ideas: A Journey to Style and Efficiency

As our walk-in wardrobes grow, hunting for the right spot for each item turns into a clever puzzle. Your walk-in closet is more than just a place to stash your stuff; it’s a personal showcase, a stage where your fashion sense shines bright. Embrace these seven tips to transform your closet ideas into a charming space that doesn’t just store your things but presents them elegantly and simplifies your daily outfit selection.

Before we delve into these essential tips, we’re going to discuss important general things that will also enhance your small walk-in closet ideas and help you maximize the space you have! In fact, maximizing space is all about smart closet design. Imagine reaching up to floor-to-ceiling shelves brimming with neatly arranged bags and shoes, all within easy view. Varied hanging rods cater to every piece, from flowing dresses to crisp shirts, ensuring they’re ready to wear and wrinkle-free.

Walk-in Closet Lighting Ideas

Speaking specifically about light, have you ever noticed how the right lighting can make everything look better? Apply this to your walk-in closet ideas. Mix bright overhead lights with softer, focused lights to banish shadows and highlight your favorite sections. Imagine a chandelier casting a warm glow over your shoe storage, making every pair look like a masterpiece.

On the other hand, you also have organization as a key piece of this puzzle. Think of your clothes as a curated collection. Organizing them should feel like arranging art. Group similar colors or styles together, making it easy to pull together outfits. Imagine the satisfaction of seeing your clothes lined up, each piece visible and ready to wear.

walk in closet

Closet Organization with Style

Your accessories also deserve their special spot! Drawers or compartments dedicated to jewelry, belts, and scarves not only keep them tidy but also turn them into a display. Picture opening a drawer to neatly arranged jewels and scarves, each waiting to complete your outfit.

And let’s not forget about those little things that will make things easier for you. As an example, a plush chair or an elegant bench isn’t just functional; it’s a statement. It invites you to sit, ponder over your outfit choices, or simply relax as you slip on your shoes. It’s a small luxury that makes a big difference.

On top of everything else, this is your space. Adorn it with artwork, a vibrant rug, or decorative boxes that speak to your style. These touches make your closet feel like a personal retreat, a space that’s uniquely and delightfully yours. and don’t hesitate to contact us if you want some extra help!

What Is a Walk-In Closet?

First things first, what is a walk-in closet? Basically, a walk-in closet is so much more than a place to store things; it’s your own private dressing area. It’s where style and practicality come together, giving you limitless possibilities to tailor and tidy up your space. It’s about more than just hanging up clothes; it’s about crafting a whole experience.

Now, let’s go back to walk-in closet ideas and discuss those important tips that will help you maximize your space:

1. Make It Multifunctional

Your closet or modern mudroom can be more than just clothes storage. A desk or vanity adds a new dimension, turning it into a workspace or a beauty spot. Add a cozy chair and a lamp, and it becomes a corner for quiet moments away from the world.

2. Keep It Open

Choose open shelving and racks for hanging items to ensure everything is visible and accessible. This approach not only gives your closet a more spacious feel but also displays your favorite items like a personal gallery. Picture how simple it would be to see all your choices with just a quick look.

3. Bring in Decorative Elements

Your closet should reflect your style. As part of walk-in closet organization ideas, a statement light, a piece of art, or a beautiful rug can add personality and warmth. These aren’t just decorations; they’re expressions of your personal taste.

4. Create Zones

Organize your closet design by category to streamline your dressing routine. A section for shoes, a zone for long dresses, and an area for accessories can turn chaos into order. Imagine how quickly you could get ready when everything has its place.

walk in closet organization ideas

5. Prioritize a Seating Area

A seat in your closet isn’t just practical; it’s a spot to pause and plan. It’s a little island of calm in your busy day. Remember, a cushioned bench or a chic chair can be a small haven within your closet.

6. Label Everything

Labels are like little guides, leading you to what you need. They bring order and clarity, ensuring that even on the busiest mornings, you can find exactly what you’re looking for without a second thought.

7. Optimize Every Inch

Look for hidden storage opportunities and storage solutions, like hooks on doors, woven baskets, custom cabinets, or extra shelves above rods. Every inch you claim is an inch that contributes to an organized, serene space. And if you’re wondering where to find custom cabinets in Las Vegas, you just found the right place!

The Final Touches to Your Walk-In Closet

As we have seen today, your walk-in closet is far more than just a spot to store your outfits; it’s a daily haven for showcasing your style and expressing who you are. By adopting versatile designs, airy layouts, personal decorative flairs, and clever organization, you can turn this area into a haven of neatness and flair. It goes beyond just making the most of the space; it’s about enhancing your daily rituals into moments of genuine delight. With these suggestions, your walk-in closet will evolve into a treasured corner of your home, where each day starts with motivation and simplicity.

How to Clean Walls Before Painting: A Step-by-Step Guide

While the allure of a fresh coat of paint is undeniable, the secret sauce to a captivating transformation is the groundwork. The pristine finish you yearn for begins with a well-prepared surface.

By giving your walls the treatment they deserve before painting, you’re investing in a finish that looks professional and lasts longer.

Here’s our comprehensive guide on how to clean walls before painting and learn the steps to ensure your paint job is nothing short of perfection.

Easy Steps for Cleaning Walls Before Painting

Cleaning the walls before painting is like prepping a canvas for a masterpiece. You wouldn’t splatter paint onto a dusty, dirty canvas, would you? Likewise, your walls need a fresh start.

Painting is not just about choosing the perfect shade of blue or debating between matte and satin finishes. And for painting assistance? Don’t just Google “house painters near me” and pick the first one. Do your research, read reviews, and then make your choice.

Remove The Dust

Imagine you’re an artist, brush in hand, standing before a dusty canvas. That’s right, you wouldn’t dream of painting over that mess. Start by brushing off the dust from your walls, ensuring they’re as clean as a fresh canvas ready for the first brushstroke. If you’re looking for guidance on how to prep a room for painting, remember that removing dust is the initial step, just as vital as picking out the perfect shade of paint.

how to prep walls for painting

Wash With Soap

Using a mild detergent (think about the gentle soap you’d use for that prized bathroom sink of yours) and some water, begin washing the walls. Imagine you’re wiping away the toothpaste splatters and soap scum to reveal the pristine surface beneath. In this cleaning dance, remember: it’s not just how to clean walls before painting; it’s about ensuring it’s ready for the next step.

Wipe Down Walls

Remember when you accidentally smeared a color on your canvas and had to wipe it down? This step is somewhat similar. After washing the walls, it’s crucial to wipe them down to remove any leftover detergent. This ensures your paint adheres properly, and you don’t end up with a Picasso when you were aiming for a Monet.

Remove Grease Stains

Like stubborn paint splatters on your easel, grease stains on your walls can be a tad tricky. But worry not, you’ve got this! For how to prep walls for painting, focus on the greasy spots. Baking soda mixed with water creates a paste perfect for the job. It’s a tad like using a magic eraser on a sketch gone wrong. And while you’re in the cleaning groove, if you’re wondering how to clean a wall in your kitchen or other areas, this method works wonders there too.

Let It Dry

Ever tried painting on a wet canvas? It’s like trying to dance in quicksand – messy and not so effective. Once you’re done washing walls before painting, give them time to dry. Let the walls breathe, just as you would let a sketch dry before adding watercolors. By the time you’re ready, it’ll be as if the walls are whispering, “Bring on the paint!”

best way to clean walls

Why It Is Important to Clean Walls Before Painting

By now, you might be thinking, “Surely, I can skip some of these steps.” But here’s the thing – imagine laying vibrant strokes on a murky background. Doesn’t sound appealing, does it? Cleaning walls before painting is akin to setting up your canvas perfectly.

This preparation ensures the paint adheres better, lasts longer, and most importantly, looks exquisite. Remember, the brilliance of a painting isn’t just in the colors you choose, but in the prep work too. And if you’re seeking to wash walls before painting in an expansive area or multiple rooms, the importance magnifies.

Contact a Professional Painter

Now, if all this talk about cleaning walls before painting feels overwhelming, just like when you think about deep cleaning that bathroom sink of yours, remember there’s always a helping hand available. For those in Sin City, there are amazing custom cabinets in Las Vegas that can completely transform your space.

If you ever feel stuck or unsure about any step in the process, don’t hesitate to contact us. Just as you’d call in a plumber for that tricky sink issue, calling in a professional ensures the job gets done right the first time.

In the grand painting journey, starting with a clean slate—or in this case, a clean wall—is the secret sauce to impeccable results. Your prepped walls will ensure your paint glides on smoothly.

How to Unclog Bathroom Sink: 7 Easy Ways

Every homeowner has faced it at some point: the slow drain, the pool of water, the unmistakable sign of a clogged bathroom sink.

While the sinking feeling of a blockage is universal, many aren’t aware of the practical, easy, and often eco-friendly ways to combat this problem. Let’s discuss the seven tried and tested methods to transform your clogged sink into a free-flowing wonder.

Reasons Why a Bathroom Sink Clogs

The bathroom is a hallmark of modern civilization. But just like our favorite soap opera, even our bathroom sink has its moments of drama.

And just as the sink in cultural references can represent the mundane or every day, there’s nothing more every day than finding out you’ve got a slow-draining bathroom sink. So, what’s behind this soggy soap opera? Hair, soap scum, toothpaste, and other gunky residues are often the culprits. Throw in some dirt and small objects, and your bathroom sink drain is in a huge mess.

If you find yourself out of sync with the types of drainage, below is a simple guide on how to remove the clog from your bathroom sink.

how to unclog a sink

How to Unclog Bathroom Sink

Navigating the murky waters of a clogged bathroom sink is a challenge most homeowners face. Keeping this essential fixture free-flowing isn’t just about convenience; it’s also crucial for maintaining good hygiene and prolonging the lifespan of your plumbing.

Knowing how to unclog a bathroom sink can save you money, prevent water damage, and bring peace of mind, ensuring your bathroom remains a functional sanctuary. Moreover, there’s no shame in reaching out to plumbing services near you when you don’t know how to unclog the bathroom sink.

Here’s what you should do:

1. Use a Standard Drain Plunger

Remember how sometimes the simplest solutions are the most effective? Well, dive into the world of sink plumbing and meet the unsung hero: the drain plunger. Picture this – your sink is the star and the plunger is the director. With a few strong pushes and pulls, you can often send that clog packing, returning your sink to its leading role. But if the scene doesn’t clear, don’t fret. There are other ways to unclog a sink.

2. Baking Soda & Vinegar / Baking Soda & Salt

Step into your kitchen and you might find the dynamic duo your bathroom sink needs. Just like salt and vinegar on chips can be a game changer, baking soda paired with vinegar or salt can be the twist in our plot. Pour some down your drain, wait, and imagine it’s the climax of the movie. Spoiler alert: Most of the time, the debris breaks down. If it’s the ending you were hoping for, well, that’s how to unclog a sink drain.

3. Boiling Water

Your sink might just be going through a melodramatic phase, and sometimes the old ways can be like a comforting rerun. Boiling water, while simple, can be just the wake-up call your drain needs. It’s like the scene in movies where a splash of cold water resets the protagonist, but here, it’s hot water resetting your sink.

4. Unclog the Sink with a Drain Snake

Okay, scene change! Enter the drain snake, the unexpected twist in our tale. Not everyone has one at home, but if you do, this tool can dig deep, latching onto the culprits causing the blockage. It’s a bit like how a plot twist can catch you unaware, but it turns out to be the very thing the story needed. If you’ve ever wondered how to remove a bathroom sink stopper, this is often a good reason.

5. Enzymatic Drain Cleaners

The bio-solution to your problem, enzymatic cleaners, might sound complex, but they’re simple and effective. They break down organic material, turning our tragic clog story into a harmonious eco-friendly tale. And often, they’re the best drain unclogger when you want a gentle approach.

6. Wet Dry Vacuum to Unstop the Sink

Here’s where things get a bit technical. If you’ve tried the earlier scenes to no avail, it might be time for a different approach. A wet dry shop vacuum set to the wet mode can create a powerful suction, turning your bathroom into an action-packed scene, and showing you just how to unclog a tub or sink, making the water flow like the plot of a good drama.


bathroom sink drain

7. Clean out the P-Trap

The P-Trap: it sounds mysterious, doesn’t it? Well, it’s the bend in the pipe under your sink, and sometimes, it’s where our villain – the clog – likes to hide. Cleaning it out is a bit like unveiling the antagonist in the final act. And if you’re unsure about how to remove the bathroom sink drain, this process can enlighten you.

When to Contact a Professional

After all the trouble, if your sink is still giving you headaches, it might be time to get the experts involved. Sometimes the problem is so great, that only a seasoned professional can untangle it. Don’t hesitate to contact us if you are having trouble with how to unclog the bathroom sink.

Unclog Your Bathroom Sink

A functional bathroom sink is crucial for both hygiene and home maintenance. By utilizing the methods outlined, homeowners can proactively tackle clogs and maintain a serene bathroom environment. And remember, when DIY solutions fall short, trust in professionals to restore your sink’s flawless performance.

How to Install a Kitchen Sink: Everything You Need to Know

Ever stared at a heap of dirty dishes and wished you had a brand-new kitchen sink to make the chore more bearable?

Imagine washing your dishes in a sink that’s not just new, but installed by you, blending seamlessly with your kitchen decor. The sense of accomplishment, combined with the visual transformation of your kitchen, is nothing short of inspiring.

Here’s a step-by-step on how to install your dream kitchen sink.

Different Types of Kitchen Sinks

Your options for kitchen sinks can be as varied as the number of dishes piled in them after Thanksgiving dinner. Below are some of them:

  • Drop-In Kitchen Sinks: These are the quintessential sinks that “drop” into a hole in your countertop. It’s like ordering the basic latte – familiar, comforting, and always a good choice. These sinks have a visible edge that rests on the countertop, making installation a breeze.
  • Undermount Sinks: Hidden champions of the sink world, these are mounted below the countertop. Think of them as the secret ingredient in a dish; you don’t see them, but they make all the difference. It’s the kind you’d find in those glossy custom cabinets in Las Vegas, sleek and hidden beneath your countertop. They provide a sleek look and make it easy to sweep countertop debris directly into the sink.
  • Farmhouse or Apron Front Sinks: These sinks wear their history on their sleeves, or rather, their fronts. A callback to kitchens from yesteryears, they feature a forward-facing side that replaces a portion of your cabinet. It’s like that heirloom dish your grandma passed down – filled with stories and character.

For those seeking something more unique, perhaps peek into custom cabinets in Las Vegas, where you can tailor-make a set-up as individual as your culinary preferences.

Is It Easy to Install a Kitchen Sink?

Learning how to install a kitchen sink isn’t like flipping pancakes. While some seasoned DIY enthusiasts may find it manageable, for most people, it’s a tad more complicated than merely washing your hands off a task.

Additionally, there are various types of drainage that you have to consider. However, with the right tools and a touch of perseverance, it’s absolutely doable.

Step-by-Step Guide

If you want to know how to install a kitchen sink, the first step is to remove the old sink and other components attached to it. Here’s how:

Disconnect and Remove the Old Sink

Before you start dreaming of your shiny new sink, you need to say goodbye to the old one. Turn off the water supply valves and start disassembling the old sink.

how to install a kitchen sink drain

Turn off the Water Supply Valves

  • Locate the water supply valves: Typically, these are located underneath the sink inside the cabinet. There will usually be two valves: one for hot water (often colored red) and one for cold water (often colored blue).
  • Turn each valve to the “off” position: Rotate them clockwise until they cannot turn anymore.
  • Open the faucet: To release any residual water or pressure left in the pipes, turn on the faucet at the sink. This will allow any remaining water to drain out.

Disconnect the Drain Lines

  • Place a bucket or towel under the drain lines: This is to catch any remaining water that may spill out when you disconnect them. And for those unfamiliar with the sink drain parts, study them first.
  • Locate the P-trap: This is the U-shaped pipe beneath the sink.
  • Disconnect the P-trap: Using a pipe wrench or adjustable pliers, loosen the nuts on both ends of the P-trap, then carefully slide it down and off the tailpiece. Be ready for water to spill out.
  • Disconnect the waste lines: If your sink has a garbage disposal, you’ll need to disconnect it from the drain. If there’s an electrical connection, make sure to turn off the power and disconnect it first.

Cut the Caulk Bordering the Sink

  • Use a utility knife or a putty knife to carefully score the caulk that’s sealing the perimeter of the sink to the countertop.
  • Be cautious: Do this gently to avoid damaging the countertop or the backsplash.
  • Once you’ve scored all the way around, try gently lifting or moving the sink to see if it’s loosened. If not, you may need to cut deeper or apply a bit more force.

Remove the Old Sink

  • After the caulk has been completely cut, slide a putty knife or flat bar under the edge of the sink to further loosen it from the countertop.
  • From below, check if there are any mounting clips or brackets holding the sink in place. If there are, loosen and remove them.
  • With the help of an assistant, carefully lift the sink out of the countertop. If it’s particularly stubborn, you might need to gently use a rubber mallet to tap it from below.
  • Once the sink is removed, thoroughly clean the area where the old sink was situated. Scrape away any old caulk or adhesive to prepare the surface for the new sink. If things get tough, and you’re unsure about how to install a sink, there’s no harm in seeking help.

How to Install a Kitchen Sink?

Venturing into the world of DIY kitchen upgrades? Mastering how to install a kitchen sink is a game-changer. Navigate through these steps to seamlessly transform your kitchen space and revel in your DIY prowess.


Measure the Countertop Opening

Starting your kitchen sink installation is a bit like preparing a new recipe: precision is key. First and foremost, measure the countertop opening accurately. An improper fit can lead to complications down the line, so use a reliable tape measure.

Ensure the dimensions align with your chosen sink, making adjustments if necessary. Think of it as ensuring your baking tin is the right size for that special cake.

replace kitchen sink

Install the Faucet and Water Supply Lines

Next, move on to the faucet and water supply lines. This is like connecting the ingredients for the perfect soup: essential components need to come together. Align the faucet with its designated hole, securing it in place.

Attach the water supply lines, ensuring a snug fit to avoid potential water leakage. The harmony between these parts is crucial for a smooth-flowing sink. And once they’re aligned, home improvement really feels within grasp.

Reconnect the Drainpipes and Appliances

With the faucet in place, it’s time to reconnect the drainpipes and any additional appliances, akin to adding the final touches to a dish. This step ensures your sink isn’t just for show but is fully functional. Tighten all connections, but take care not to overtighten and damage the parts. It’s all about finding the right balance, like seasoning a meal.

Turn on the Water and Test for Leaks

Finally, the moment of truth. Turn on the water, watching its flow, like seeing a recipe come to life. Be vigilant for any signs of leakage. Should you spot any unwelcome drips, revisit your connections and seal any gaps. Remember, perfection takes time, but with patience, you’ll have a sink that’s both stylish and efficient.

When to Contact a Professional

Sure, going the DIY route can be enticing, much like attempting a complex dish for the first time. However, sometimes it’s best to call in the professionals, just like you’d head to a restaurant for a gourmet meal.

If you ever find yourself in over your head, don’t hesitate to reach out to plumbing services near you. And for those in Las Vegas, you can always contact us. After all, installing a sink can be tricky, but it doesn’t mean you have to throw everything and the kitchen sink at the problem.

Installing a kitchen sink can be a rewarding endeavor, enriching both your DIY skills and your home’s aesthetic. With the right guidance, patience, and tools, your kitchen can shine anew. Remember, every successful project starts with a single step, so take the plunge and transform your kitchen today!

Seasonal Plumbing Maintenance: What to Do Each Season to Maintain Your System

Homeowners often overlook the importance of regular maintenance until a disaster occurs. But did you know that you can prevent significant issues, protect your plumbing system, and save considerable money with consistent attention?

This comprehensive guide touches on seasonal plumbing maintenance. Learn what you can do each season to maintain your system’s efficiency, prevent damage, and reduce unnecessary costs. Just like caring for your home’s furniture, maintaining your plumbing system should be part of your routine.

Why Is Maintenance So Important?

Maintenance is essential in extending any home system’s lifespan and functionality, from custom cabinets in Las Vegas to plumbing. A well-maintained system is likely to experience fewer failures and need fewer costly plumbing repairs. Regular maintenance helps you detect minor issues before they become significant problems, protecting your home plumbing from damage, preventing water waste, and saving money.

Like a high-quality piece of furniture, the plumbing system needs care and attention to maintain efficiency. Regularly inspecting your system and undertaking plumbing maintenance can prevent significant malfunctions, reduce energy consumption, and prolong the system’s lifespan. Indeed, maintenance is as vital as ensuring your prized Las Vegas custom cabinets are kept in top condition.

Plumbing Maintenance and HVAC Maintenance

Apart from plumbing, your heating, ventilation, and air conditioning (HVAC) systems also demand regular attention. Both these systems often work hand in hand. Commercial plumbing services often offer HVAC maintenance in their package because the two are interconnected. If your pipes freeze and burst in the winter, it can affect your heating system. Similarly, if your HVAC system isn’t draining correctly, it can lead to plumbing issues.

Professional plumbing maintenance services have the knowledge and tools to ensure that your plumbing and HVAC systems are in optimal condition. By doing so, they help homeowners avoid the discomfort and inconvenience of unexpected breakdowns.

plumbing repairs

Winter Plumbing Maintenance

Winter is often the harshest season for your home plumbing. As temperatures dip, the water in your pipes can freeze and expand, causing pipes to burst. To avoid such a disaster, insulate your pipes, especially those in unheated areas of your home. Keep your house warm, even if you’re away, to prevent freezing.

Disconnecting garden hoses, shutting off, and draining water from pipes leading to outside faucets are also essential. These plumbing maintenance tasks will prevent residual water from freezing and causing damage.

Spring Plumbing Maintenance

Spring plumbing maintenance mainly involves checking for any damage incurred during the winter. Look out for leaky faucets, dripping pipes, or malfunctioning water heaters. Also, check the areas around appliances for any signs of water damage.

Spring is also an excellent time to check the sump pump to protect your basement from flooding as snow melts and spring rains come. Pour a few gallons of water into the sump pit to ensure the pump works correctly.

Summer Plumbing Maintenance

Summertime means vacations, and before you leave, you should prep your plumbing system to prevent any potential issues while you’re away. Set your water heater in “vacation” mode to save energy. Additionally, consider turning off the main water supply to prevent leaks.

It’s also important to check your sprinkler system for leaks or malfunctions and clean the sprinkler heads. Lastly, ensure that your gutters and downspouts are clean and debris-free to handle summer storms.

If you encounter any plumbing problems during this time, don’t hesitate to contact us. We offer comprehensive plumbing system maintenance and services to keep your system running smoothly.

plumbing system

Fall Plumbing Maintenance

Fall plumbing maintenance involves preparing your plumbing system for the upcoming winter. Drain the water from outdoor faucets and garden hoses and store them indoors to prevent freezing. Clear leaves and other debris from your gutters and downspouts to prevent blockages and potential water damage.

Fall is the perfect time to address any plumbing repairs inside the house before winter sets in. Check your water heater and ensure it’s ready for the colder months. Lastly, inspect your sump pump and pit, especially if you live in an area that experiences heavy autumn rains.

Summary

Regular and seasonal maintenance ensures your plumbing system’s efficient and long-lasting performance. Just as you’d take care of your custom cabinets in Las Vegas or any other cherished household features, your home’s plumbing deserves the same care and attention. With DIY plumbing tips and help from professional plumbers, you can protect your system and home from the potentially damaging and costly consequences of neglect.

Essential Checklist and Tips for Hiring a Contractor

Selecting the right contractor can be a make-or-break factor in your home renovation project. The contracting world can be complex, featuring different types of contractors, including general, specialty, and subcontractors, each with unique roles and skills.

If you need help hiring a contractor, read this checklist for insightful tips to help select the right professionals for your home renovation project. By the end of this article, you’ll be well-prepared to begin your exciting journey to your dream home.

Types of Contractors

When it comes to home renovation projects, it is vital to understand the types of contractors available to you. Las Vegas residential contractors fall broadly into three categories: general, specialty, and subcontractors. Each has a distinct role in ensuring your home project is completed perfectly.

General Contractor

A general contractor is akin to an orchestra conductor, coordinating and overseeing the various aspects of a project. When hiring a general contractor, you’re acquiring the services of an industry expert who will manage the entire renovation, from obtaining building permits to purchasing materials and scheduling inspections. Their role is especially crucial for large, complex projects that require multiple tradespeople.

Specialty Contractor

On the other hand, specialty contractors are professionals hired for specific tasks within the project. They are experts in a single field, like plumbing, electrical work, or carpentry. For instance, if you’re looking for custom cabinets in Las Vegas, you would engage a specialty contractor experienced in cabinetry.

Sub Contractor

Subcontractors are also experts in a specific field, similar to specialty contractors. However, they are typically hired by the general contractor, not the homeowner. They work under the general contractor’s supervision, contributing their expertise to portions of the project.

find a contractor

How to Hire the Right Contractor

Once you understand the types of contractors and have determined which suits your project, it’s time to tackle finding a contractor. With careful planning and diligent research, you can ensure you engage a professional who meets your specific needs.

Use this hiring contractor checklist to help you make the best choice.

Plan Your Project

Before you begin hiring a general contractor or any other kind of professional, you need to have a clear vision of what you want to accomplish. It’s essential to detail your plans, including the types of materials you prefer, the colors, and any special features, such as custom cabinets in Las Vegas. Providing these specifics will enable potential contractors to give you a more accurate estimate and timeline for the project.

Check References

Once you have your project plan, begin your search for potential contractors. Personal recommendations from family and friends can be invaluable. Also, consider online resources such as home improvement websites, social media, and online reviews.

As part of your hiring a contractor checklist, always ask potential contractors for references. This can include previous clients, suppliers, and subcontractors. Contact these references to gauge the contractor’s reliability, work ethic, and quality of work. Honest reviews from past clients can provide valuable insight into your expectations.

Check Out the Past Project Photos

Visual evidence of a contractor’s work is also essential. Reviewing photos from past projects can help you assess the quality of the contractor’s work and see if their style aligns with your vision. Request references and take the time to reach out to them. Inquire about the contractor’s communication style, work quality, budget and timeline adherence, and overall project outcome satisfaction.

However, photographs can be deceiving, so it’s always better to see the contractor’s work in person. If possible, visit a contractor’s current job site or a recently completed project to assess the quality of their work firsthand.

how to hire a contractor

Verify Licenses and Insurance

Ensuring your contractor has the proper licenses and insurance is a crucial step in hiring. Licensing ensures the contractor meets specific industry standards, while insurance protects you from liability in case of an accident during the project.

Ask the contractor to provide proof of licensing and insurance, and feel free to verify these documents with the relevant authorities. You can do this online or by contacting the state or county licensing board. If you need assistance verifying our licenses and insurance, don’t hesitate to contact us.

Require a Written Contract

A written contract is non-negotiable when hiring a contractor. The contract should clearly outline the scope of work, budget, payment schedule, timeline, and other pertinent details. Having a written agreement provides legal protection for both parties and helps to prevent miscommunications or disputes down the line.

Once you’ve selected a contractor, negotiate the terms of the project. Only start a project with a signed contract in place.

Monitor the Job in Progress

Once the project begins, it’s essential to stay involved. Regularly checking the project’s progress will give you an idea of whether the contractor is sticking to the schedule and budget. It lets you catch any issues early and discuss them with the contractor. Remember, though, that excessive interference could hinder the contractor’s work, so find a balance that works for both of you.

Throughout the project, maintain open lines of communication with your contractor. Regular check-ins and updates help ensure the project progresses as expected and any issues are promptly addressed. Remember, your contractor is your partner in this venture, and a positive working relationship can greatly contribute to the project’s success.

Getting the best contractor n your area is a manageable process. With the proper knowledge, preparation, and vigilance, you can ensure you hire a contractor who is not only suitable for your project but also reliable, skilled, and professional. By following this guide, you’re well on your way to a successful home renovation project.

A Step-by-Step Guide: How to Install Kitchen Backsplash Like a Pro

Transforming your kitchen into a culinary haven takes more than just top-tier appliances and chef-grade utensils—it’s also about creating a visually striking ambiance. Installing a stylish kitchen backsplash is one of the most effective ways to do this.

A carefully installed backsplash not only adds a splash of personality to your kitchen, but it also offers practical benefits. It provides a robust protective layer, safeguarding your walls from stains, splashes, and spills during those hectic cooking sessions.

You can achieve a professional-looking finish by following this comprehensive on how to install kitchen backsplash.

Planning, Materials, and Tools

The first steps how to install a kitchen backsplash are proper planning, gathering suitable materials, and ensuring you have all the necessary tools. Your project can efficiently run into snags without the proper preparation.

Here is a comprehensive list to help ensure you’re well-prepared:

Planning

Begin by deciding the look you want to achieve with your backsplash. Consider your kitchen’s existing color scheme, your preferred tile material and pattern, and the type of grout that will complement your choice.

Kitchen Backsplash Materials

The primary material for this project will be your tiles. These can be ceramic, glass, stone, or porcelain and will be the main visual element of your backsplash. Other kitchen backsplash materials include:

  1. Thin-set Mortar: This will adhere the tiles to the wall.
  2. Non-sanded Grout: Used to fill in the gaps between your tiles. A non-sanded grout is preferred for backsplashes as it won’t scratch the tile surface.
  3. Tile Spacers: These ensure consistent space between your tiles.
  4. Sealer: A sealer will be required if you use natural stone tiles to prevent staining.

how to install tile backsplash in kitche

Tools

Gather the necessary tools for your project. These will include:

  1. Tape Measure and Level: These will ensure accurate measurements and a level installation.
  2. Notched Trowel: This is used to apply the thin-set mortar to the wall.
  3. Grout Float: You’ll need this to apply the grout between the tiles.
  4. Tile Cutter or Wet Saw: You’ll use this to cut tiles for the edges of your backsplash and around outlets.
  5. Bucket and Sponge: These will be used for mixing the grout and cleaning up excess from the tiles.
  6. Safety Equipment: Remember safety glasses and gloves to protect yourself during installation.

Steps How to Install Tile Backsplash in Kitchen

As you learn how to install backsplash in the kitchen, custom cabinets in Las Vegas could be the perfect addition to complement your newly installed backsplash. Now, let’s move on to how to install the kitchen backsplash.

Figure Out Your Design

Before starting, decide on your design. This may include the pattern, color, and style of the tile you want to use. You could choose a herringbone, brick, or mosaic pattern, depending on your taste. Be creative and think outside the box – remember, your backsplash reflects your personality!

Calculate Your Tile Measurements

Knowing how to install a backsplash kitchen involves a bit of math. Backsplash tile installation requires accurate measurements to ensure you purchase the correct tiles. Measure the height and width of the space where you plan to install the backsplash, then multiply these two numbers to get the square footage. It’s a good idea to buy about 10% more tiles than you need to account for breakage or miscalculations.

Clean the Wall

For a successful backsplash tile installation, the wall where the backsplash is to be installed must be clean and smooth. Remove any grease, dirt, or wallpaper, and fill any cracks or holes with a suitable filler. Once filled, sand the area smoothly and wipe clean.

Draw a Center Line

Next, find the center of your wall and draw a vertical line. This line will guide you, ensuring your tile installation is level and centered.

Apply Thin-Set

Learning how to install tile backsplash in a kitchen involves mastering thin-set. Thin-set is a bonding mortar that sticks your tiles to the wall. Apply it evenly with a notched trowel, working in small sections to prevent it from drying before you’ve set your tiles.

Install the Tile Backsplash

Start from the bottom center and work your way up and out when installing the tile backsplash. This is a crucial part of learning how to install kitchen backsplash. Remember to place spacers between the tiles to ensure consistent grout lines. Please contact us if you have questions or prefer a professional to handle your installation.

how to install backsplash in kitchen

Set the Tiles

After placing your tiles, press them into the thin set using a grout float. This will ensure that they’re firmly attached to the wall. Allow the thin-set to dry for 24 hours.

Apply the Tile Grout

Once the thin-set has dried, it’s time to grout. Applying a grout float at an angle ensures it fills all the spaces between the tiles. Be sure to remove any excess grout from the surface of the tiles with a damp sponge.

Wipe with Dry Towel

After the grout has dried (typically after 24 hours), wipe the tiles with a dry towel to remove any haze left by the grout. With that, you’ve completed the installation process of the kitchen backsplash.

Summary

Now that you’re equipped with this step-by-step guide, you can give your kitchen a refreshing, stylish upgrade. Embarking on this do-it-yourself project, you’ll add a personal touch to your kitchen and enhance its functionality. Remember, take your time and enjoy the process; each tile placed brings you closer to a beautifully transformed kitchen.

Understanding the Types of Drainage Systems

Most modern structures have a drainage system that helps manage wastewater. By controlling where stagnant water ends up, the drainage system helps prevent various health and safety hazards to commercial and residential properties.

Finding out the different types of drainage systems is essential, and knowing what’s best to use on a case-to-case basis is essential to mitigate water damage in any building.

This article discusses the various drainage systems used today and the advantages of using each type. Moreover, it will also cover some of the factors you need to consider if you are planning to install a drainage system.

What is a Drainage System?

A drainage system is a network of pipes, gutters, and drains that remove excess liquids from a specific location. The wastewater is then moved into a septic tank or a sewer system.

Its primary purpose is to collect and remove wastewater and keep sewer gases out of the structure. The piping for a drainage system is typically made of plastic or metal, in contrast to the piping that transports water into a building.

The Different Types of Drainage Systems

Drainage systems fall between two categories which are open drains and closed drains. Open drains are primarily used to collect wastewater that’s not considered sewage. Meanwhile, closed drains are fit underground to collect and transport water into the main network.

You must maintain your drainage system properly if you don’t want water in the basement. Below are the main types of drainage systems usually installed in commercial and residential properties.

what is a drainage system

Residential Drainage Systems

This drainage system commonly installed in homes removes extra water from specific locations. This system assists in directing water away from roofs., walkways, and driveways to avoid flooding in the property. They are essential to prevent structural damage caused by water damage, rotting, mildew, and mold.

Surface Drainage Systems

Surface drainage systems use ditches and drainage channels to remove excess water from the ground’s surface. The system also uses hollows, grassed streams, drains, and levees to allow the water to flow outward of the property.

Subsurface Drainage Systems

This drainage system is installed under the soil’s top layer to remove unwanted water at the root level. A subsurface drainage system requires digging deep ditches and installing underground pipes, which lead to a vast collector drain.

Slope Drainage Systems

Slop drains help manage excess water flow downwards through a network of pipes placed downward a slope. It moves the water away from a structure towards a slight incline where the pipes are installed. This design allows the water to flow naturally.

Downspout and Gutter systems

This drainage system collects water from gutters and moves it to the ground. A downspout connected to the building’s gutter system carries water from the roof and into the soil. The water is then moved on a slope which prevents it from pooling.

Factors to Consider for Proper Drainage System

Most drainage systems work together in removing water and redirecting it to a proper location. However, many homeowners or business owners often need to pay more attention to the importance of planning which drainage they must use.

Hiring a reliable building planner and excellent residential contractors can help you install the best drainage system for your property. Below are some factors you must consider when choosing a drainage system.

  • The volume of rain in your area: Consider the average amount of rain pours in your area per year by looking at available climate data.
  • Installation period and performance: Review how the drainage system will perform and whether you have plenty of time to install it before the next rainy season.
  • The steepness of the slope in your area: Slopes are great for drainage since they can help remove excess water naturally. Find out the slope angle near your building or property and if it can be used for drainage purposes.
  • Availability of drainage companies in your area: Find out if a nearby drainage service company can help you install the drainage system. You should do it yourself if you are away from their service area.
    water drainage system

Your Responsibilities Regarding Your Drainage System

Homeowners are responsible for private drains within their property’s boundary. If you reside in a private home connected to the public sewers, you will be responsible for some of the pipes that make up this connection and may also be required to pay for their upkeep or repair.

If you need drainage system installation or maintenance service, Majestic is here. We have the best drainage planners and installers with years of experience and the right tools. Contact us today to get a reasonable quote.

7 Ways to Create a Modern Mudroom in Your Home

Are you tired of coming home to a cluttered and disorganized entryway?

A modern mudroom could be just what you need. It’s a small entryway or room near the front or back door of a house, specifically designed to handle the mess and clutter that typically accumulates when people enter and exit the home.

In this article, we’ll share seven creative and practical ways to create an ergonomic mudroom that adds functionality and sophistication to your home.

What are the Benefits of a Mudroom?

Mudrooms often feature storage space for shoes, jackets, hats, umbrellas, and other outdoor gear, as well as hooks and racks to keep everything organized and tidy.

Not convinced that you need a mudroom? Here are a few benefits that might change your mind:

  1. Convenience: A mudroom is a convenient space to store and grab items as you enter and exit your home. This can save time and make your daily routine more efficient.
  2. Keeps your home cleaner: This room provides a designated space for dirty and wet items, preventing dirt and mud from being tracked throughout the rest of your home.
  3. Aesthetic Appeal: A well-designed mudroom can enhance the aesthetic appeal of your home. It’s an opportunity to add color, texture, and personality to your space. With a mudroom, you’ll spend less time searching for lost items and more time enjoying your home.
  4. Improved Safety: Wet shoes and boots can be a slipping hazard on smooth floors. By having a designated space to dry off and store wet gear, you can prevent accidents.
  5. Adds value to your home: A well-designed mudroom can be a major selling point for potential buyers, adding value to your home and making it more attractive to future buyers.

Ways to Create a Modern Mudroom in Your Home

Built-in Mudroom Closets and Cabinets

If you want to take your mudroom to the next level, consider installing custom cabinets and closets. This will not only give you a place to store your coats and shoes but will also allow you to keep your mudroom organized and clutter-free.
With built-in closets and cabinets, you can take advantage of vertical space and maximize storage capacity. They allow you to customize your mudroom to fit your specific needs. You can include shelves for hats, hooks for bags, and cubbies for shoes, making it easier for everyone in your household to keep their belongings in their designated spots.

modern mudroom ideas

Mudroom Storage Ideas

A modern mudroom is only complete with creative storage ideas. A bench with built-in storage is a great way to add a functional element to your mudroom while keeping the clutter at bay. Not only can you sit down to put your shoes on, but you can also store them underneath.
Another great storage idea for a mudroom is to add a pegboard. This is a simple and inexpensive way to hang items like jackets, hats, and scarves. You can even paint the pegboard to match the decor of your mudroom, making it both functional and stylish.

Open Storage for a Mudroom

If you prefer a more open and airy feel for your mudroom, open storage may be the way to go. Instead of hiding everything behind closed doors, you can showcase your belongings with open shelving.
Open storage can make a small mudroom feel bigger and brighter, allowing light to filter through and minimizing shadows. Plus, it gives you easy access to your belongings, making it easier to grab what you need and go.

Mudroom Bench

Why settle for a plain old bench when you can have a modern one? Consider a bench with built-in storage, such as drawers or shelves. This will not only provide a place for shoes and other gear, but it will also keep everything organized and out of sight.

And if you want to get fancy, opt for a bench with a cushion for added comfort. This will make it more inviting for you to sit and take a breather, or for guests to kick off their shoes.

Mudroom Cubbies

Cubbies are another essential element of a mudroom design. They provide individual storage spaces for each household member, making it easier to find your belongings and keep them organized. But why settle for a basic cubby when you can have a modern one?

Opt for cubbies built into the wall or ones designed to look like part of the wall. This will create a sleek and minimalist look while still providing ample storage. You can also add some hooks above the cubbies for storage and organization.

Reach out to a Las Vegas cabinet installation company so they can help you with your project.

mudroom ideas

Multi-Purpose Mudroom ideas

Why limit your mudroom to just being a spot for muddy shoes and jackets? With a little creativity, you can make it a multi-purpose space that serves other functions. For example, you can add a desk to your mudroom and use it as a home office. This is especially useful if you work from home and need a quiet and private space.

You can also add a workout area to your mudroom with exercise equipment and a yoga mat. These modern mudroom ideas will help you stay in shape without leaving your house.

Mudroom Shoe Storage Ideas

Try adding a shoe rack that can be mounted on the wall or a shoe cabinet with multiple compartments. This will not only provide ample storage space, but it will also keep your shoes out of sight, which is especially useful if you have a lot of pairs.

Furthermore, add a shoe carousel if you like a fancier room. This rotating shoe rack will save space and add a touch of luxury to your mudroom.

Conclusion

Your mudroom doesn’t have to be a basic and boring space. Contact us today so we can help you plan, build, or remodel your mudroom.

Turn your mudroom today into a stylish and functional area with creativity and a few modern touches.

5 Living Room Remodel Ideas

As the famous saying goes, “Home is where the heart is,” and for many families, the living room is the heart of any home. After all, it is where the family gathers to relax, unwind, and spend quality time with one another.

That is why it’s crucial to have a living room that is not only functional but also aesthetically pleasing. Whether you’re planning a complete overhaul or a few minor changes, these incredible living rooms remodel ideas will help you create a beautiful and comfortable space.

What comes first in remodeling the living room?

The living room is often the home’s central hub, where you relax, entertain, and spend quality time with your family.

In any remodeling project, the first step is establishing a clear plan and a blueprint. Think of your living room remodeling project as a blank canvas you can paint with your personality and taste.

Start by asking yourself what your goals are for the renovation. Do you want to create a more comfortable space? Do you want to make it more modern or stylish?

Search over the Internet using “house painters near me” so you can hire a local craftsman to remodel your living room.

living room remodel

Factors to Consider in Renovating Your Living Room

When planning to renovate your living room, there are several factors that you need to consider to ensure a successful renovation. Here are the key factors to keep in mind:

Living Room Size and Layout

The size and layout of your living room can significantly impact your renovation. If you have a small living room, consider a more minimalistic design to make it look more spacious.

On the other hand, if you have a larger living room, you can consider more intricate designs with more decorative elements. In either case, ensuring that the design complements the room’s layout is crucial.

Full or Partial Renovation

A full renovation involves a complete overhaul of the area, including structural changes and replacing all the finishes. It involves completely overhauling your living room, including removing walls, flooring, and ceiling.

Meanwhile, a partial renovation, on the other hand, involves replacing only some parts of the room, such as the flooring, wall decor, lighting fixtures, or furniture. A partial renovation can be a good option if you’re on a budget.

Room Expansion

If you have some extra space available, consider expanding your living room. This could involve knocking down walls, adding an extension, or creating an open-plan layout. A larger living room can create a more spacious and comfortable atmosphere, perfect for entertaining guests or relaxing with your family.

However, room expansion can be expensive, so it’s essential to consider your budget before deciding.

DIY or hire a professional

One of the most significant decisions you’ll need to make is whether to tackle the project yourself or hire a professional.

If you have experience in home renovation, you can handle the renovation yourself. While a DIY approach can save money, it requires time, effort, and skill. You can also take inspiration from DIY ideas for home by searching the Internet.

Conversely, hiring a professional can be more expensive, but it ensures a higher quality of work and can save you time and stress.

Living Room Remodel Materials

When planning your living room renovation, it’s essential to consider the materials you’ll be using. You can choose from various materials like wood, tile, or carpet. Each material has advantages and disadvantages.

For example, consider using reclaimed wood, leather, and vintage-inspired fabrics if you love rustic decors. If you prefer a more modern look, you might opt for sleek and minimalist materials, such as metal, glass, and concrete.

Hence, when choosing the materials for your living room to remodel ideas, you must consider your budget and preferences.

Incredible Living Room Remodel ideas

If your living room feels cramped and claustrophobic, expanding the space might be the perfect solution. Knocking down a wall or two can open up your living room and make it feel more airy and expansive.

Alternatively, adding a conservatory or a sunroom can create a beautiful, light-filled space that can be used for relaxing or entertaining.

living room before and after

Change or Fix Flooring

The flooring in your living room plays a vital role in the overall look and feel of the space. If your flooring needs to be updated, damaged, or not to your taste, it’s time to make a change.

From hardwood to carpet, plenty of flooring options are available to suit your style and needs. A new floor can also add value to your home and make it more appealing to potential buyers.

Upgrade Decor

Decorating your living room is a fun and creative way to add personality and style to your space. Updating your decor doesn’t have to be expensive or time-consuming.

Simple changes like adding new throw pillows, changing your curtains, or hanging a new piece of art can make a big difference. Adding indoor plants can create a fresh and inviting ambiance, like a breath of fresh air.

If you need custom cabinets in Las Vegas, let Majestic Cabinets assist you with your living room remodel project.

Update Lighting

Lighting is always a given when you want to renovate a room. It not only illuminates the space but also sets the mood and ambiance. If your living room feels dark and gloomy, updating the lighting can make a big difference.

From overhead lights to floor lamps, plenty of lighting options are available to suit your style and needs.

Replace Windows

Windows are an integral part of any living room. They provide natural light, fresh air, and a view of the outdoors. If your windows are old or damaged, it’s time to replace them.

New windows not only improve the look and feel of your living room but also improve energy efficiency, reduce noise, and increase security.

Change Your Accents

Sometimes, it’s the little things that make the most significant impact.

Changing your accents might be the perfect solution if you need more time to be ready for a complete living room remodeling. From new pillows to rugs, accessories, and wall art, plenty of accents are available to suit your style and taste.

Choose the Perfect Color Palette

Like a rainbow that adds color to the sky after a storm, a new color palette can add vibrancy and energy to your living room.

If your living room feels outdated or uninspired, choosing a new color palette can breathe new life into the space. Consider the mood and ambiance you want to create when choosing a color palette.

Soft and neutral tones create a calming and relaxing space, while bold and bright colors add excitement and energy. Adding accent colors through throw living room accessories can create a cohesive and stylish look.

Transforming your living room can be a fun and rewarding process. Contact us today so we can help you remodel the living room of your dreams.

Moreover, feel free to get creative and make the changes that will turn your living room into the heart of your home.