
6 Proper Steps to Install a Kitchen Sink Without Costly Errors
Installing a kitchen sink means removing the old sink, placing the new one correctly, sealing it properly, reconnecting the plumbing, and testing everything for leaks.
A kitchen sink is used every day, and one small mistake during installation can lead to water leaks, swollen cabinet panels, mold, pipe issues, and costly repairs later.
Even a minor drip under the sink can slowly damage the cabinet base and create problems that stay hidden until the repair bill gets much bigger.
If you are in Las Vegas and want the job handled with care, Majestic Cabinets LLC is a trusted choice for kitchen upgrades and cabinet work.
From kitchen cabinets to cabinet refinishing, cabinet refacing, and full remodeling support, our team offers quality workmanship and reliable service.
For help with your project, you can contact Majestic Cabinets LLC at 1-702-457-1158 or info@majesticcabinetsllc.com.
Quick Answer: Is It Easy to Install a Kitchen Sink?
Yes, sometimes. A basic drop-in sink replacement is often the easiest type because the sink rim rests on the countertop.
An undermount sink is harder because it needs stronger support, careful sealing, and a very accurate fit.
Farmhouse sinks can be the most demanding because they often require cabinet changes and front-facing support.
Pick the Right Sink Before You Touch the Plumbing
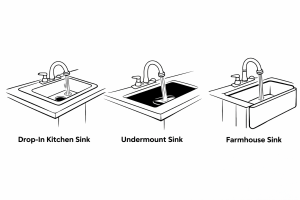
Meta Tag: Types of Kitchen Sinks
Start with the sink type. This decision affects the entire installation.
- A drop-in kitchen sink works well for many replacement jobs because it sits into the countertop cutout and is easier to secure.
- An undermount sink creates a cleaner look and makes countertop cleanup easier, but it usually needs stronger mounting and is better handled by experienced installers or countertop pros.
- A farmhouse sink can look beautiful, but it may require cabinet trimming or support changes before installation. Fit, clearance, and support matter before any cutting begins.
Before buying, check four things: sink width, bowl depth, cabinet width, and faucet hole layout.
Do not assume your new sink will match the old cutout exactly. Even a small size difference can turn a quick replacement into a countertop or cabinet project.
Tools and Parts You Will Likely Need to Install a Kitchen Sink
Most sink installations need a tape measure, adjustable wrench, channel-lock pliers, utility knife, bucket, towels, screwdriver, plumber’s putty or approved sealant for the drain assembly, and silicone sealant for the sink edge if the manufacturer calls for it.
You may also need new supply lines, a basket strainer, sink clips, a tailpiece, a P-trap kit, and fittings for a garbage disposal if one is part of the setup.
It is smart to inspect older drain and supply tubing and replace worn parts during the job instead of reusing weak components.
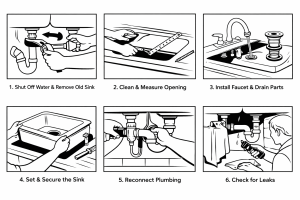
Meta Tag: Steps to Install a Kitchen Sink
Step 1: Shut Off Water and Disconnect the Old Sink
Turn off the hot and cold shutoff valves under the sink. Then open the faucet to release any remaining water pressure.
Place a bucket below the drain trap before loosening fittings because there is almost always water left inside the P-trap.
Disconnect the supply lines, drain pipe, and garbage disposal if you have one. If the disposal has power, switch off the breaker first. Then cut the old caulk or sealant around the sink edge and remove mounting clips from below.
Lift the old sink out carefully so you do not chip the countertop or damage the cabinet rails.
This is the point where many people rush. Do not. Slow removal protects the countertop opening, which is one of the most important parts of the whole job.
Step 2: Clean and Measure the Opening
After removal, scrape away old silicone, putty, and grime. The opening needs to be clean and dry before the new sink goes in.
Now measure the cutout accurately. This sounds obvious, but it is where many bad installs begin.
Clearances, hole locations, and cut dimensions must match the sink requirements before installation. On some models, faucet hole clearance and spacing are critical.
If your old sink was a shallow double bowl and your new sink is a deep single bowl, the drain location may shift lower.
That can interfere with the garbage disposal, the trap arm, or storage space inside the cabinet.
If this step makes you realize your kitchen needs more than a sink replacement, the luxury kitchen cabinet ideas can help you think through style, storage, and layout.
Step 3: Install the Faucet and Drain Parts First
In many cases, it is easier to install the faucet, soap dispenser, basket strainer, and drain fittings before the sink is fully secured in place.
You have more room to work when the sink is upside down or on a protected surface.
Mount first, connect lines, flush, then finish the rest of the setup.
Use the sealing method by the manufacturer for the drain assembly.
Tighten evenly. Over-tightening is a common mistake and can crack parts or distort seals.
Step 4: Set and Secure the Sink
For a drop-in sink, apply the recommended bead of sealant around the edge of the cutout, lower the sink into place, center it, and tighten clips gradually in sequence. Do not crank one side all the way down first.
For an undermount sink, the support system matters. Handle cutouts and mounting holes correctly before installation. Undermount work is better for experienced installers because alignment and support are more demanding.
For a farmhouse sink, make sure the cabinet structure can support the weight if the sink is fireclay or cast iron. This is one of the times to bring in a pro.
Step 5: Reconnect Water Lines and Drain Plumbing
Reconnect the supply lines to the faucet. Then connect the tailpiece, P-trap, trap arm, dishwasher hose if present, and garbage disposal if you have one.
This part should feel snug, not forced. Cross-threaded fittings and badly aligned drain parts are major leak sources.
Follow local plumbing and building codes, which matter if you are changing drain layout, disposal setup, or sink type.
Step 6: Test for Leaks the Smart Way
Turn the water on slowly. Run both hot and cold water. Then fill the sink and drain it while watching every joint below.
Wipe each connection with a dry paper towel to catch slow drips that your eyes may miss.
This step is more important than people think. EPA says household leaks waste nearly 1 trillion gallons of water every year, and even small home leaks add up fast.
Under-sink drips are one of those problems people often ignore until the cabinet floor is already damaged.

Final Note!
The best way to install a kitchen sink is to treat it like a precision job, not a quick swap.
Measure carefully, use the right sink type for your countertop and cabinet, seal every connection properly, and always test for leaks before you close the cabinet doors.
If the project starts touching cabinet structure, countertop changes, or full kitchen improvements, talk to Majestic Cabinets LLC for your Las Vegas cabinet needs.
People Also Ask
What is the easiest type of kitchen sink to install?
A drop-in sink is usually the easiest to install because it rests on the countertop opening and does not need the same support system as an undermount sink. It is often the best choice for a simple replacement.
How long does it take to install a kitchen sink?
A basic replacement can take a few hours if the sink size matches the current opening and the plumbing lines line up. It can take much longer if you need cabinet work, countertop changes, or a new drain layout.
Why does a new kitchen sink leak after installation?
Most new sink leaks happen because of loose drain fittings, poor alignment, bad sealing, or over-tightened parts that damage the seal. Slow leaks under the sink are easy to miss, so always test with running water and a full-bowl drain.
What should I check before buying a replacement kitchen sink?
Check the cabinet width, countertop cutout size, sink depth, drain placement, and faucet hole setup. You should also confirm whether your countertop can support a drop-in, undermount, or farmhouse sink style.
How do I know if I need a professional sink installer?
You likely need a professional if the project requires cutting stone, changing cabinet supports, moving plumbing, or installing a heavy farmhouse or undermount sink. It is also smart to hire help when you see water damage or structural wear inside the sink base cabinet.